Installing Sitecore Commerce Server 8 and Sample Site
Installing Sitecore Commerce Server 8
This guide aims
at giving you a one-stop guide on how to setup Sitecore Commerce with MongoDB and Sitecore 8 from the
beginning to allow you to commence development with Sitecore Commerce Server 8.
There are many blogs and documentation around this and different ways to do this lengthy process but none of it seems clear. I've tried to make the steps in order and simpler. I've used Sitecore documentation and references from many blogs to compile this documentation.
This guide will assume you have a
fresh install of IIS (with Default Web Site intact,
otherwise create it), SQL Server 2012, Visual Studio 2013, and nothing else. It
has been tested on a Windows 8.1 machine.
- Install Sitecore and MongoDB by following my guide to Installing Sitecore 8.0 and MongoDB.
This guide has been
tested with Sitecore 8.0 revision 150621, so I encourage you to use this
version.
For the rest of
this guide I will assume you have Sitecore running on http://sc80rev150621 as suggested by the Sitecore Instance
Manager and that the
physical installation path for this website is C:\Sitecore\sc80rev150621. If you’ve used different values,
you need to change where appropriate throughout this guide.
- Go to Control Panel > Programs and Features > Turn Windows Features on or off, and ensure you install the following components before you proceed any further.
- Windows Identity Foundation 3.5
- IIS Metabase and IIS 6 configuration compability. It’s located under Internet Information Services > Web Management Tools > IIS 6 Management Compatibility. This is required by Commerce Server.
- ASP. It’s located under Internet Information Services > World Wide Web Services > Application Development Features. This is used for some of the old reports in Commerce Server.
- Windows Authentication. It’s located under Internet Information Services > World Wide Web Services > Security. This is required for the Commerce Server Business Tools to work.
Also ensure you
have Windows Authentication enabled for SQL Server.
- Download and install the latest version of the Commerce Server stand-alone software. This is a ~100mb download. Click on this link, login with your Sitecore credentials and click on the Commerce Server link in the left column.
Make sure you
complete the Commerce
Server Configuration Wizard that
appears automatically. The first screen of the guide can be seen below.
Ensure you click the button Test to confirm
that it can connect to SQL Server. Otherwise leave the remaining settings as
they are.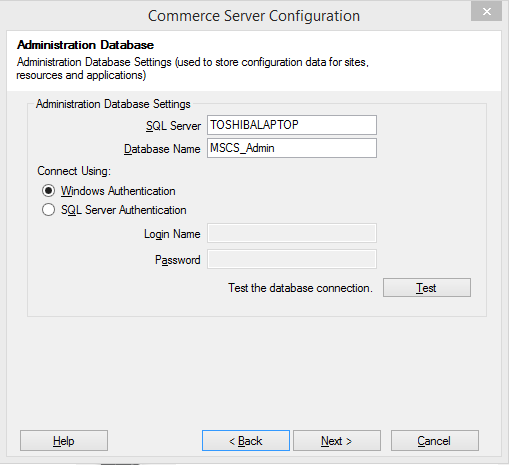
On the next screen
(below), enter your Windows password in the Password field.
On the
remaining screens, you can simply press Next. You
have completed the installation when the MSCS_admin database
appears in the SQL Server Management Studio Object Explorer.
- Install Sitecore Commerce Connect. According to the documentation, “this is an e-commerce framework designed to integrate Sitecore with different external commerce systems and at the same time integrate customer engagement functionality provided in the Sitecore Experience Platform”. I.e. regardless of which eCommerce platform you’d use, you need to install this.
Download it here, go to http://sc80rev150621/sitecore, login, go to the Sitecore Control Panel,
then select Install a Package. It
mentions a post-installation step, which you can skip for the purpose of this
guide.
- Download Sitecore Commerce Server Connect by following this link and select it from the left column. Notice that this is separate to the Sitecore Commerce Connect installed in the previous step. This provides functionality only usable with Commerce Server. To install it, go to http://sc80rev150621/sitecore/admin/updateinstallationwizard.aspx and follow the guide.
- Download the MVC Site Deployment Scripts from this page (see the left column a bit down on the page). This is a zip filled called Deploy.zip. Unpack it to C:\Deploy (I’ll be using this path throughout this guide). These deployment scripts are used to unpack a site in Commerce Server, so the appropriate site specific databases and web services are installed.
- Download the full zip package of the Sitecore Storefront site from Github. This contains all the source files for the Storefront site, so you later can open it in Visual Studio and explore the code. Expand it into C:\Deploy\Reference-Storefront-master and delete the AX folder and the Commerce.Dynamics.Storefront.sln file as we won’t be using any functionality related to integrating with Dynamics AX.
- Copy the six folders from C:\Deploy\Reference-Storefront-master\Storefront\CS\Database into the folder C:\Deploy\Database and overwrite any existing files. This means that when you invoke the deployment scripts, they will use the Storefront prepared Commerce Server databases.
- Open C:\Deploy\Deployment\Environment.xml and set the following parameters with the values shown. Notice that all the parameters appear multiple times in the file, and you should replace them whenever they are defined as variables.
Variable Name
|
Existing Value
|
New Value
|
instanceName
|
CSSitecore
|
sc80rev150621
|
INETPUB_DIRECTORY
|
$( Join-Path -Path $Env:SYSTEMDRIVE -ChildPath
“inetpub” )
|
C:\Sitecore
|
SitecorePort
|
7655
|
80
|
scHostHeaderName
|
sc.local
|
sc80rev150621
|
Also ensure that
you have installed MongoDB in C:\MongoDB. If not, you need to change the
MongoDB path as well everywhere it appears.
- Now we’re ready to execute the Commerce Server scripts that installs the Storefront Commerce Server site.
- Open a Powershell window
- Enter Set-ExecutionPolicy Unrestricted and select Y.
- Browse in the Powershell window to the location C:\Deploy\Deployment.
- Type ./Deploy-UnPup.ps1 and hit Enter. Type r, then hit Enter, as many times as is required to accept the security warnings.
- Type ./Deploy-Base-SC-Existing.ps1 and hit Enter. Type r, then hit Enter, as many times as is required to accept the security warnings.
To confirm this has been executed
successfully, observe that you should now have 6 x SolutionStorefrontSite_ databases in SQL Server Management Studio.
- From https://github.com/Sitecore/Reference-Storefront/releases, download Sitecore.Reference.Storefront.for.SCpbCS.8.0.130.0.zip and extract the three files in the Packages folder (Adventure Works Images.zip, Sitecore.Reference.Storefront.Powered.by.CommerceServer.8.0.130.0.update,Sitecore.Reference.Storefront.Common.8.0.130.0.update).
- First install Sitecore.Reference.Storefront.Common.8.0.130.0.update using the Sitecore UpdateInstallationWizard.aspx.
- Then install Sitecore.Reference.Storefront.Powered.by.CommerceServer.8.0.130.0.update also using the Sitecore UpdateInstallationWizard.aspx.
- Finally install the Adventure Works Images.zip (which essentially contains the product images) by going to the Sitecore Control Panel and selectingInstall a Package.
- Rename the file C:\Sitecore\sc80rev150621\Website\MergeFiles\Merge.Commerce.Storefront.config to Merge.MVCSite.config.
Go back to the Powershell window
and execute ./Deploy-Base-SC-Merge.ps1. This will merge web.config sections
from the files in the MergeFiles folder into the
main website web.config file.
- Open C:\Sitecore\sc80rev150621\Website\web.config, find the parameter siteName=”CSSolutionStorefrontSite” and change it to SolutionStorefrontSite (i.e. remove “CS”)
Also find
<add
type=”publicKey”
value=”registry:HKEY_LOCAL_MACHINE\SOFTWARE\CommerceServer\Encryption\Keys\CSSolutionStorefrontSite,PublicKey”
/>
<add
type=”privateKey1″
value=”registry:HKEY_LOCAL_MACHINE\SOFTWARE\CommerceServer\Encryption\Keys\CSSolutionStorefrontSite,PrivateKey”
/>
and change these two values as well
to remove “CS” in front of SolutionStorefrontSite.
Verify that you can browse to http://sc80rev150621/ and http://sc80rev150621/sitecore without getting any exceptions to ensure that the
Commerce Server configuration has been correctly applied.
- Now we want to setup a fully compilable Storefront solution in Visual Studio that includes all the source files used.
- Move the three folders CommonSettings, TDSCommon_Master and Project from C:\Deploy\Reference-Storefront-master\Storefront\Commonto C:\Sitecore\sc80rev150621.
- Move the three files (including the solution file) from C:\Deploy\Reference-Storefront-master\Storefront to C:\Sitecore\sc80rev150621.
- Move all files, except web.config, from C:\Deploy\Reference-Storefront-master\Storefront\CS\CSF to C:\Sitecore\sc80rev150621\Website. Overwrite existing files.
- Open the .sln file in a text editor (not Visual Studio!) and change the folder path references for the top four projects to be correct.
- Create a new folder C:\Sitecore\sc80rev150621\Dependencies and copy all files from the C:\Sitecore\sc80rev150621\Website\bin folder into theDependencies folder. Delete the two Sitecore.Reference.* files afterwards as they will conflict with the output of the build.
- Open the solution in Visual Studio. Unless you have Team Development Suite installed, you will get a warning when you start it up that two projects are unsupported. You can ignore this for the purpose of this guide.
- Now you get DLL hell. Don’t worry, they can all be fixed:
- Update all the projects to use ASP.NET MVC 5 using NuGet by calling Install-Package Microsoft.AspNet.Mvc -Version 5.2.3 on all the projects.
- For the Commerce.Storefront project, refresh DotNetOpenAuth using NuGet by calling Install-Package DotNetOpenAuth.
- Delete the references to Sitecore.ContentSearch.SolrProvider and Sitecore.ContentSearch.SolrProvider.CastleWindsorIntegration as they are not necessary for the purpose of this guide.
- Find the file CommerceServer.Core.Internal.ContentListHelper.dll in the folder C:\Windows\Microsoft.NET\assembly\GAC_64\CommerceServer.Core.Internal.ContentListHelper\v4.0_10.0.0.0__f5c79cb11734af7a from the GAC, copy it do the Dependencies folder and add a reference to it in the Commerce.Storefront project. This is to prevent the solution from (somehow, not sure why!) copying in the (wrong) 32 bit version of this assembly.
- For the remaining missing assemblies, whether the system complain at compile time or at runtime, simply go through and add any missing ones from the Dependencies folder you created earlier. Most, if not all the exceptions you’ll get, will be caused by files that exist in the Dependencies folder but are missing from the bin folder.
- Verify you can access http://sc80rev150621 with no exceptions thrown after having compiled the whole solution. You will still only see the original one-page sample site, which is okay for now.
- Do a full publish of the entire site.
- In your hosts file, add a new mapping for cs.reference.storefront.com to 127.0.0.1.
Also add this mapping as a binding
in IIS for the sc80rev150621 website for port 80.
While you’re in IIS, also add a
binding for SSL for the hostname cs.reference.storefront.com for port 443 to the sc80rev150621 website using a self-signed certificate.
The checkout process of the Storefront site is running on HTTPS so this is
necessary if you want to place an order (which you do!)
Verify you can go to http://cs.reference.storefront.com. However observe that there are no products shown.
- Index the site:
Click Sitecore > Control Panel > Indexing > Index Manager. Check sitecore_master_index and sitecore_web_index,
then click Rebuild.
- Try placing an order and creating an account! This should work (it did for me!)
- Now you probably want to look this newly placed order up to ensure it has been stored correctly in the database. To do this, either have a look at thePurchaseTable in the SolutionStorefrontSite_transactions database through SQL Server Management Studio, or you can use the Commerce Server Windows application called Customers and Orders Manager which you can find in the Start Menu > Commerce Server 11 > Business Tools. To get this application to work, you need to perform the following additional steps:
- Open C:\Program Files (x86)\Commerce Server 11\Business User Applications\CustomerAndOrdersManager.exe.config and set AllowHTTP to True.
- Ensure
you can browse to the following four web services and get the standard
list of methods available:
http://localhost:1000/SolutionStorefrontSite_CatalogWebService/CatalogWebService.asmx
http://localhost:1000/SolutionStorefrontSite_MarketingWebService/MarketingWebService.asmx
http://localhost:1000/SolutionStorefrontSite_OrdersWebService/OrdersWebService.asmx
http://localhost:1000/SolutionStorefrontSite_ProfilesWebService/ProfilesWebService.asmx
- Start the Customers and Orders Manager application and click the Edit button. Update the three web services to use the URL’s shown above (ignore the Marketing Web Service one for now). You can now login to the application. Click Orders in the left panel, and find Look in where you should select Purchase Order. Then find Look for and select Date last modified. Then click Find and your order should show up!
This is the end of this (long)
guide! Hopefully by now you’ve managed to setup the sample Sitecore Commerce
Server Storefront site and can see how Sitecore envision we develop eCommerce
sites in the future through Sitecore and Commerce Server. Having a working
sample site certainly helps in understanding how many features work.
Let me know if you have any
comments.


Comments
Post a Comment